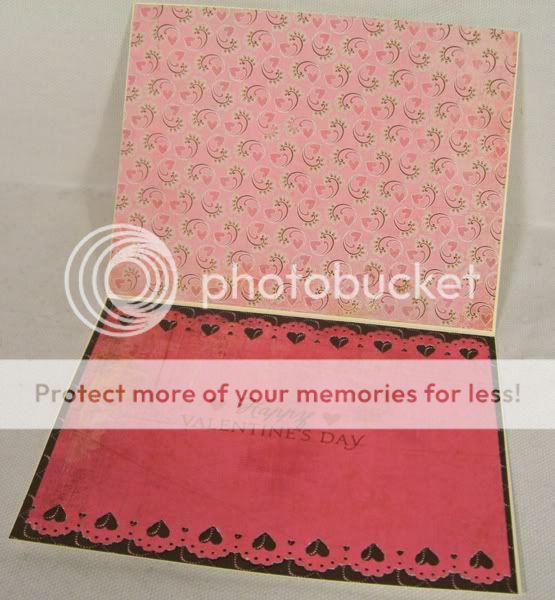
Waltzingmouse Stamps, one of my favorite companies for clear stamps, posted a challenge to "CASE" a card that one of their DT members made during a recent Spellbinders Grand Calibur feature. Since I love their stamps and want to participate in as many of their challenges as possible, I took this one on!
Unfortunately, I don't have a TON of WMS stamps (yet!), and I don't have any of theirs in a Valentine's theme, so most of the stamps on my card are from other companies...but I hope they won't mind!
First off, let me just say that I ADORE Copic coloring. That is to say that I adore when other people do it. I would love to learn to do it myself, but I haven't yet had the funds to spring for the Copic marker set that I want, nor have I been able to take the Copic certification class that I'd like to take. So, suffice it to say that I don't really know what I'm doing when it comes to coloring with alcohol markers. All I have at the moment are a set of 36 Bic Mark-it markers, which are nice quality, but it just isn't enough colors to do any shading justice. Plus I don't have a colorless blender. This is why my tulips on this card became "Impressionist" tulips. You have to use your mind's eye to see all the detailed shading that I wish were there, but isn't really! LOL...someday...I will be a certified Copic colorist, but for now, impressionism will have to do! ;)
I chose to CASE Carly's Robertson's card, seen here:
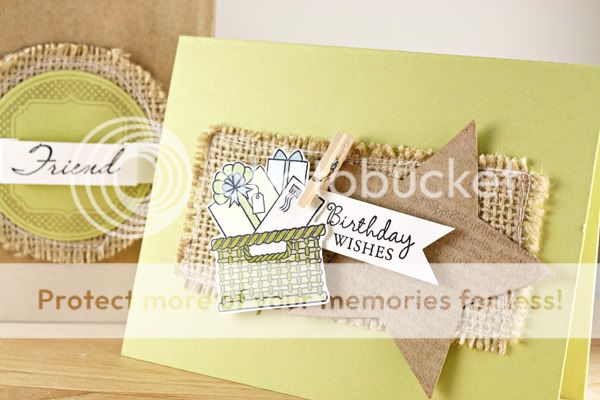
I liked how simple and clean it was, as I usually have trouble creating a simple card that I end up liking. As you can see, I did add a little bit more to my card than the original card, but I just felt that mine needed a bit more. This was a fun challenge!
Supplies used:
Cardstock: Pure Poppy (Papertrey)
Patterned Paper: Dark Brown handmade (Darice); Valentine paper stack (Martha Stewart Crafts)
Stamp Set(s): Vintage Picnic (Papertrey); Love You Much (Stampin' Up); Afternoon Tea Sentiments (Waltzingmouse)
Ink: Dark Chocolate Hybrid (Papertrey); Tulip & Grey Wool (CTMH)
Tools: Swirls Texture Plate (SU); Mini hearts embossing folder (Cuttlebug); Double Banners die (Papertrey); Doily Hearts punch (MS Crafts)
Monday, January 31, 2011
Thursday, January 27, 2011
H2H Challenge January Week 4
This week's H2H challenge (my first participating, yay!) is to make a card featuring an animal or bird. Since I'm still putting together Love/Valentine cards, I pulled out an oldie but goodie set from CTMH, Free Spirit. This is one of the first sets that I bought from CTMH, and though I've long since cleared out many of my other sets that I bought this long ago, there is something about this one that I still like! I don't have a TON of stamp sets that have birds in them, so I was glad to have this one to turn to.
Supplies used:
Outside:
Card base: L1 pre-printed page, That's Amore (CTMH)
Cardstock: Colonial White (CTMH); Vellum (Papertrey)
Patterned Paper: none
Stamp Set(s): Free Spirit (CTMH)
Ink: Chocolate, Blush (CTMH); Tattered Rose (Distress Ink)
Embellishments: Lg Doily Heart (Michaels); Ribbon (Stampin' Up); Button (Papertrey); Waxy Flax & Red Sparkles (CTMH)
Tools: Spellbinders dies, Scallop Circles; Blending Tool (Ranger)
Inside:
Patterned Paper: That's Amore
Stamp Set(s): Love Lives Here, Sweet Love (Papertrey)
Ink: Tulip (CTMH)
Epoxy brads: Basic Grey
Tuesday, January 25, 2011
More recently created cards
I guess I'm becoming quite the craftin' fool lately! Hah! Making tons of cards, posting to my blog, participating in challenges, etc...I think my husband thinks he's lost me to the "dark side". I hate to tell him, but it's only going to get worse! ;) (ssshh, don't tell him I said that)
The focus of most of my cards right now is Valentine's/Love. Problem is, I don't need 35 Valentine cards for myself! But I have so many cute Valentine stamps and papers, that just the few that I would need for my hubby, kids & close family are certainly NOT enough! I love making cards for Operation Write Home, which is a wonderful cause. However, the deadline to send them Valentine's cards was January 7!! Gah! Who can possibly get all their Valentine's cards finished by one week after the new year??? Well, since that deadline has long since passed, I decided to focus on sending them LOVE cards, but not necessarily Valentines. Soldiers overseas are probably always needing love cards to send home to the spouses & family that they're missing. So I'm making lots of love cards to send to OWH. There's a selfish motive to it too...I get to play with all my Valentine supplies that I'm so in the mood to use lots of! All I have to do is avoid stamping "Happy Valentine's Day" on them, and I'm good. There are so many other adorable lovey-dovey phrases to use, so no worries there!
Now that I've babbled on, here are the cards I'm sharing so far....(there will be more, no doubt)
And I have one more...a break from lovey cards for a sad occasion. I learned recently that a crafting acquaintance of mine lost her husband to a hard-fought battle with leukemia. Even though we rarely see each other, I was deeply saddened when I heard. I made her this sympathy card:
PS - I'm writing this post late at night and I'm feeling too lazy to write many details about these cards as far as what materials I used...if anyone happens to see this and wants to know, feel free to ask! :)
Good night!
Papertrey January Blog Hop & Mojo Monday 175
Yay! My first participation in a Papertrey Blog Hop. Hopefully this is just the beginning. My life is such that I'm barely getting this posted by the 8:30pm (PST) deadline!! Ha...do I procrastinate, or what? I guess you could say I do tend to procrastinate a bit. Anyway....
I decided to kill two birds with one stone this time and make my Papertrey Blog Hop card also based on the Mojo Monday sketch from yesterday. I made two versions, just slightly different, just to try out a couple different ideas.
The challenge was to use a Papertrey set that you've had but haven't had a chance to use yet...I decided that I needed to pull out that adorable set I bought before Christmas ~ Background Basics: Christmas. Such cute little borders, and what I love about them is that they can be used for Christmas and beyond. I also bought a very cute new set last month, 2010 Love Tags. I had yet to even take it out of the packaging! As I said, such is my life. But I dove in with relish and I must say that I LOVE this set too! (Come to think of it, I love all my Papertrey sets ;)
In addition to these, back in October or November, I bought Calendar Basics in the anticipation of making lovely mini calendars as Christmas gifts. In spite of these good intentions, the mini calendars became more like New Year's gifts, as I didn't get to ink up this stamp set until the 2nd week of January! Better late than never...
So without further ado, I present my first Papertrey Blog Hop post of my two cards and a couple pics of my mini calendar ~ the outside packaging - LOVE those clear boxes the stamps come in...so great to reuse!! AND the first month of the calendar. Each month is pretty simple...just a different patterned paper + a Bible verse.
Mojo Monday 175 sketch:
Version #1:
Version #2:
Materials used:
Cardstock: Dark Chocolate (PTI), Kraft
Patterned Paper: Bittersweet (Basic Grey)
Stamp Sets: 2010 Love Tags, Background Basics: Christmas, Cupcake Collection, Handwritten Notes
Ink: Versamark, Dark Chocolate (PTI), Worn Lipstick & Walnut Stain (Ranger), Bubblegum & Blush & Vineyard Berry (CTMH)
Embossing Powder: White (CTMH)
Tools: Spellbinders dies, Scallop Circles & Circles; Double-Ended Banner die (PTI)
Ribbon: Organdy (CTMH); Pink Double-Stitched (Michaels)
Mini Calendar, Outside Packaging:
Mini Calendar, January:
Tuesday, January 18, 2011
B&W&R Valentine's Day
And here's more stitching that I haven't really done much before ~ hand stitching! I LOVE the look of this too! So much fun. I've been looking for designs that would enable me to use up more of my stash, including the zillions of eyelets & brads I have. While I like this look, I must admit that it was very time consuming and would probably NOT be a design that I'd frequently use!
Patterned paper: Stampin' Up
Stamp Set: Love Birds, Papertrey
Double Banners die cut: Papertrey
Patterned paper: Stampin' Up
Stamp Set: Love Birds, Papertrey
Double Banners die cut: Papertrey
Mojo Monday 174 }}} Love Birds #1
Wow, I can't believe I'm actually posting a Mojo Monday card! I've watched this blog for ages, but have never seemed to be able to getting around to doing what was necessary to get involved in posting. But, one of my goals for this year is to participate more in posting and submitting my work, so this is a good (albeit small) start!
I'm all about Valentine's/Love cards right now, so I chose papers from Basic Grey's Bittersweet line. One of the many new Papertrey sets I got for Christmas was begging to be used, so I got it out and inked it up! Love this one, 'tis super adorable! -->> Love Birds
Other materials used:
Ink: CTMH Chocolate, Hollyhock; Colorbox Chestnut Roan
Baker's Twine: Papertrey
Ribbon: Michaels
Buttons: Assorted
Mat Stack 3 die: Papertrey
Home & Heart will never part...
Here's another card that I created to continue practicing my stitching. I used a newer Papertrey ink set, Love Lives Here, to stamp the sentiment & hearts on the front. I like this sentiment for my Operation Write Home cards...I thought it would be fitting for someone in the military to send home.
Other materials used:
Coluzzle heart template
Vellum
Cuttlebug border embossing folder
Basic Grey Bittersweet papers
Handmade paper
Ranger Distress Ink, Fired Brick & Antique Linen
Other materials used:
Coluzzle heart template
Vellum
Cuttlebug border embossing folder
Basic Grey Bittersweet papers
Handmade paper
Ranger Distress Ink, Fired Brick & Antique Linen
Saturday, January 15, 2011
A spirit lifter card
The quest to practice my stitching continues...and this card reminded me of one of the fun yet challenging aspects of crafting...the screw-up fixer! When I make a mistake that looks terrible on a card, the creative challenge is then to fix it!
With this card, I stamped the sentiment on the white cardstock piece, then intended to stitch the white piece to the blue piece on top and bottom. The bottom stitching came out allright (though not as perfect as I was hoping), but something happened when I tried to stitch on the top...the stitches got all loose and totally screwed up! (I still don't know what happened...I don't think I did anything differently between top and bottom, but who knows? I may be cursed when it comes to sewing) I had to figure out how to cover up those wonky top stitches...so I put a strip of terrifically tacky tape and covered it with glitter! The end result was pretty okay. Sometimes it's fun to have to figure out how to fix your mistakes!
Anyway, I made this card for my sweet friend whom I met through being a Chemo Angel. I want to make bright & cheery cards for her. I got one of my new Papertrey sets specifically with her in mind. The set is called Up, Up & Away. I LOVE it! It has coordinating dies to cut the clouds and the balloons, so I used those...then added some flock to the clouds.
Wednesday, January 12, 2011
Now on to Valentine's cards...
So a little bit of background on this card...I've been dying to up my paper crafting skill set for ages by learning how to include gorgeous sewing machine stitching on my projects. Now, I'm very "challenged" when it comes to anything having to do with sewing, so in December, I upgraded to a slightly better sewing machine model and took a usage class for absolute beginners. (believe me, I needed this) At the end of the 2 hours, I felt more confident in my ability to sew stitching on my cards.
But then, with all the other projects I had in December, I didn't have a chance to touch my sewing machine again until yesterday! Of course, I had mostly forgotten what I had learned the month before, and had to do lots of practice, along with gobs of errors on scratch cardstock, before I was able to make this card.
So here is my first (in a long time) attempt at paper crafting stitching. I still have a lot to learn, and lots of practice until I get my stitching more perfected, but fortunately, stitching on cards is forgiving, and still looks pretty cute even if it's not perfect. I'm pretty happy with how this card turned out. I used Papertrey's set, Heart Prints.
Inside:
One more December item
Just a quick addition here...I already posted pictures of these cards and notepads I made as teacher gifts (notepads here), but I wanted to show how I packaged up the card & notepad to give away. I used Papertrey's medium glassine bags, punched a hole on either side and tied the card - in a clear envelope - to the notepad with a ribbon. Fun.
A long overdue post...
So, as you can see, I'm certainly NOT yet at the place in my life where I am able to maintain an active blog where I post regularly...but that's one of my goals for this year!
Back in early to mid December, I went crazy planning a tea party birthday for Natasha. Since we had the party at a tea room, I didn't have to purchase party decorations, plates, utensils, etc. Sooo, since I had relieved myself of that expense & obligation, I decided to saddle myself with the herculean task of creating all handmade favor bags! It was actually a ton of fun, but very time consuming. I'm so glad that I had my grandma here to help, or it wouldn't have all gotten done!
I tried my hand at shaped candy making with molds for the first time. I LOVED it! All the candies we made turned out so cute, and perfect for the celebration they were for. On top of that, I got to create fun & pretty packaging for the candies with my paper crafting supplies. I had a total blast, and was thrilled with how everything turned out. Below are the pictures, posted FINALLY after almost a month has gone by!
December 16, class birthday party favors - Happy Birthday candy lollipops
December 17, class Christmas party stocking stuffers - a variety of little Christmas shaped candies. I used the Papertrey stamp set, Just For You, to make the little label stickers for the bags.
December 18, finally the BIRTHDAY PARTY!! At Attic Secrets Tea Room. Here are the favor bag photos:
Outside of bag - stamped with a Stampin' Up stamp around wheel (borders) and then the little tea cup and tag are from a Papertrey set, Tea Time Additions. The name tag was cut with my Cricut Expression.
I included a little bracelet making set, and packaged it in a small glassine bag, with the outer tag also stamped with the Just For You Papertrey set. ( I LOVE this set! It has so many stamps to make packaging for a huge variety of handmade gifts)
Adorable little teacup/teapot lollipops also included in the favor bag. This is the cutest mold!
I also included some homemade hot cocoa mix, packaged in little red plastic bags with a cute label made from Papertrey's set, Everyday Treats (love this set too!) and the Mat Stack 4 die. (I didn't have quite enough red bags, so one of them was packaged in a medium glassine bag) I also used some stamps from Papertrey's Holiday Treats set. Can you tell I'm a fanatic Papertrey fan?
Here are the adorable teacup & teapot candy cupcake toppers that we made. The following picture shows how sweet they looked on top of the cupcakes! The whole thing was really tasty too.
Finally, I made some bags of cookies for some members of my church's praise team. I had some cute snowman zip bags, so I simply made this little cardstock wrapper, stamped with more images from Everyday Treats & Holiday Treats.
Whew! Well, that pretty much catches up on all my December paper crafting projects. I had planned to make some fun handmade mini calendars as Christmas gifts, but with everything else I did, I didn't get to it. They ended up being "New Year's gifts", so I'll post more on those later.
Subscribe to:
Posts (Atom)